Dell
nieskategoryzowany
Brocade 6510
Dell Brocade 6510 Instrukcja
Oto Dell Brocade 6510 (nieskategoryzowany) instrukcja użytkownika. 24 strony w języku Angielski o wadze 3.3 Mb. Jeśli nie możesz znaleźć odpowiedzi na swoje pytanie Zapytaj naszą społeczność.
Strona 1/24
Brocade 6510 QuickStart Guide
Complete the steps in this guide to install and set up your Brocade 6510 switch in a single-switch configuration using
EZSwitchSetup. See the Brocade 6510 Hardware Reference Manual Fabric OS Administrator’s Guide and the (located on the
Brocade Family Documentation CD ) if you want to choose a different setup.
Ensure at th you have the it listed b ow. Write down the IP etwor va i h p e pro ded.ems el n k lues n t e s ac vi
Getting Ready
Fi IP ad essxed dr (IPv IPv6) for4 or the sw h (no DHCP server): __________________________________________________itc
Subnet mask value: ______________________________________________________________________________________
Default Gateway value: ___________________________________________________________________________________
Brocade switch World Wide Name (WWN): located on the switch ID pullout: ________________________________________
Ethernet connection (hub or switch) Ethernet and Fibre Channel Cables
EZSwitchSetup CD Setup computer
Host computer with an installed HBA Disk array
Standard screw driver Optical transceivers (SFPs)
Browser that allows pop-up windows
1Powering up and connecting cables to the switch
3
Installing and starting EZSwitchSetup
2
1. Insert the EZSwitchSetup CD into the CD-ROM drive of your setup computer. The installer will autostart in about a minute.
2. Follow the EZSwitchSetup directions for installation. Installation will take a few minutes after you click OK.
3. Wait for EZSwitchSetup to start, which should happen automatically after it is installed.
For Windows and Linux instructions, refer to the EZSwitchSetup Administrator’s Guide.
4. On the EZSwitchSetup screen, choose the option that matches your setup configuration:Introduction
• Ethernet connection. This option uses the Ethernet LAN connection you will use for running EZSwitchSetup Manager.
• Direct connection to the switch with a serial cable.
Most users will find it more convenient to use the Ethernet connection.
5. Click Next. Connect Cables The screen is displayed.
4. Click Next.
• If you chose to use the Ethernet connection, the screen is displayed. Enter the switch WWN, followingDiscover Switch
the instructions on the screen. After completing switch discovery, the screen Discover Switch Set Switch IP Address
is displayed.
• If you chose to use the serial port connection, the screen is immediately displayed.Set Switch IP Address
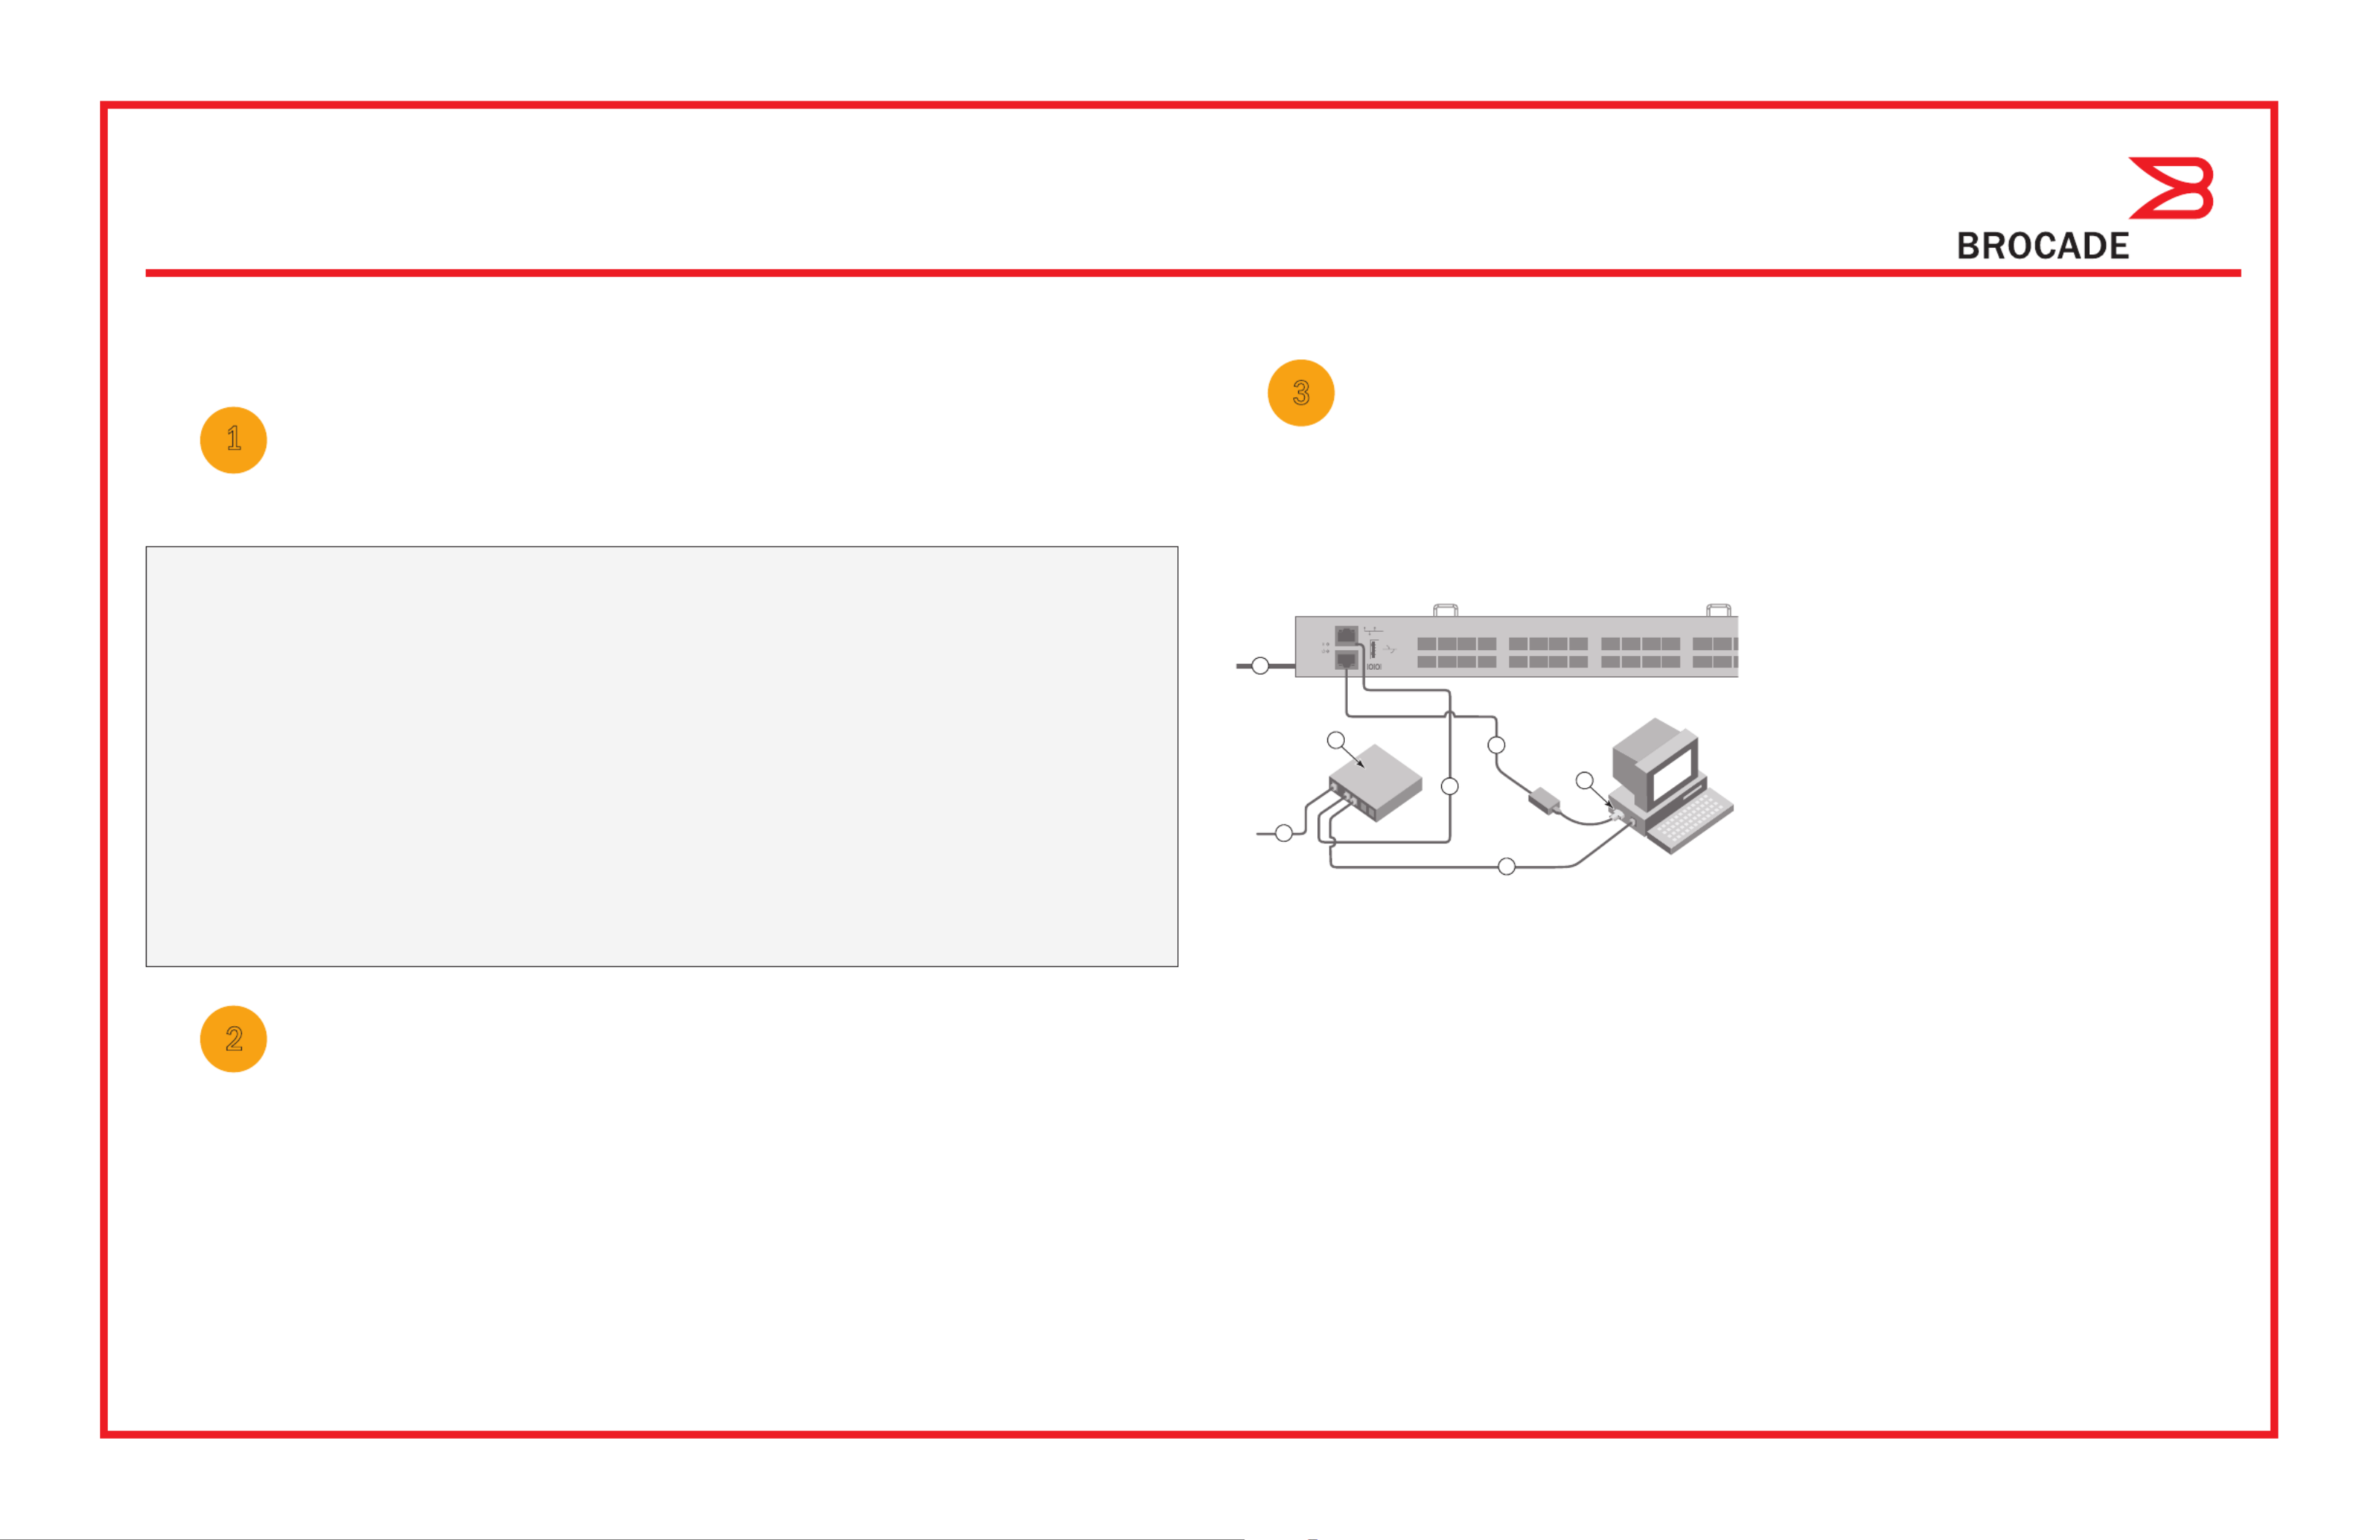
The screen shows you the connections you need to make.Connect Cables
1. Connect the power cord to the switch and to a power
source (1). The power and status LEDs display amber then
green. This can take from one to three minutes.
2. Connect the switch and the setup computer to the
same LAN, using Ethernet cables (3, 5) and an Ethernet
hub or switch (2). Be sure the Ethernet hub or switch is
connected to a power source (6).
3. If you want to use a serial connection for setup, connect
your setup computer COM port (7) to the serial port on the
switch, using the serial cable shipped with the switch (4).
The serial connection settings are as follows:
• Bits per second: 9600
• Databits: 8
• Parity: none
• Stop bits: 1
• Flow control: none
®
1
2
7
5
3
6
4
Rozwiązywanie problemów Dell Brocade 6510
Jeśli dokładnie przeczytałeś instrukcję, ale nie znalazłeś rozwiązania swojego problemu, poproś o pomoc innych użytkowników
Specyfikacje
| Kolor produktu: | Szary |
| Częstotliwość wejściowa AC: | 47/63 Hz |
| Napięcie wejściowe AC: | 85 - 264 V |
| Wysokość produktu: | 43 mm |
| Szerokość produktu: | 438 mm |
| Głębokość produktu: | 443 mm |
| Waga produktu: | 9160 g |
| Standardy komunikacyjne: | IEEE 802.3, IEEE 802.3u |
| Pełny dupleks: | Tak |
| Obsługa PoE: | Nie |
| Zakres temperatur (eksploatacja): | 0 - 40 °C |
| Zakres wilgotności względnej: | 10 - 85 % |
| Zarządzanie przez stronę www: | Tak |
| Układ: | 1U |
| Liczba portów USB 2.0: | 1 |
| Szyfrowanie / bezpieczeństwo: | HTTPS, SSH |
| Zakres temperatur (przechowywanie): | -20 - 70 °C |
| Dopuszczalna wilgotność względna: | 10 - 90 % |
| Liczba wentylatorów: | 2 went. |
| Ilość jednostek zasilania: | 2 |
| Obsługa jakość serwisu (QoS): | Tak |
| Protokoły zarządzające: | HTTP, SNMP v1/v3 |
| Możliwości montowania w stelażu: | Tak |
| Dopuszczalna wysokość podczas eksploatacji (n.p.m.): | -15.2 - 3048 m |
| Typ przełącznika: | Zarządzany |
| Ilość portów Fast Ethernet (copper): | 1 |
| Wielkość tabeli adresów: | - wejścia |
| Przepustowość rutowania/przełączania: | 384 Gbit/s |
| Produkt stackowalny: | Nie |
| Złącze światłowodowe: | LC |
| Raport zdarzeń systemowych: | Tak |
| obsługuje SSH/SSL: | Tak |
| Obsługa zasilania zapasowego (RPS): | Tak |
| Liczba portów: | 24 |
| Dopuszczalna wysokość (n.p.m.): | -15.2 - 12000 m |
| Port konsoli: | RJ-45 |
| Limit częstotliwości: | Tak |